Saturday, 15 November 2014

Feed importer in Adobe CQ/AEM

AEM comes with a pre-installed feature to import feeds into CQ. Feed importer comes with capability to import RSS and Atom feeds.

Hey!! Wait before that you must be thinking, what is a feed?

Web feed is a way to provide users with updated content. Web feeds are commonly used for news updates as news are the most frequently updating data.

Feed importer is a service to fetch data from feeds or any external source of data on a periodic basis and save data fetched, in the form of CQ page.It polls the specified external data source in given interval.


Here are the steps how to create feed importer in CQ :


Firstly, create a page under which all the imported data will be saved in the form of CQ:Page. All the new pages that will be created under root page will have sling:resourceType property's value same as the root page.

Now once root page is created, create Feed importer :

Open http://<host>:<port>/etc/miscadmin and go to importers
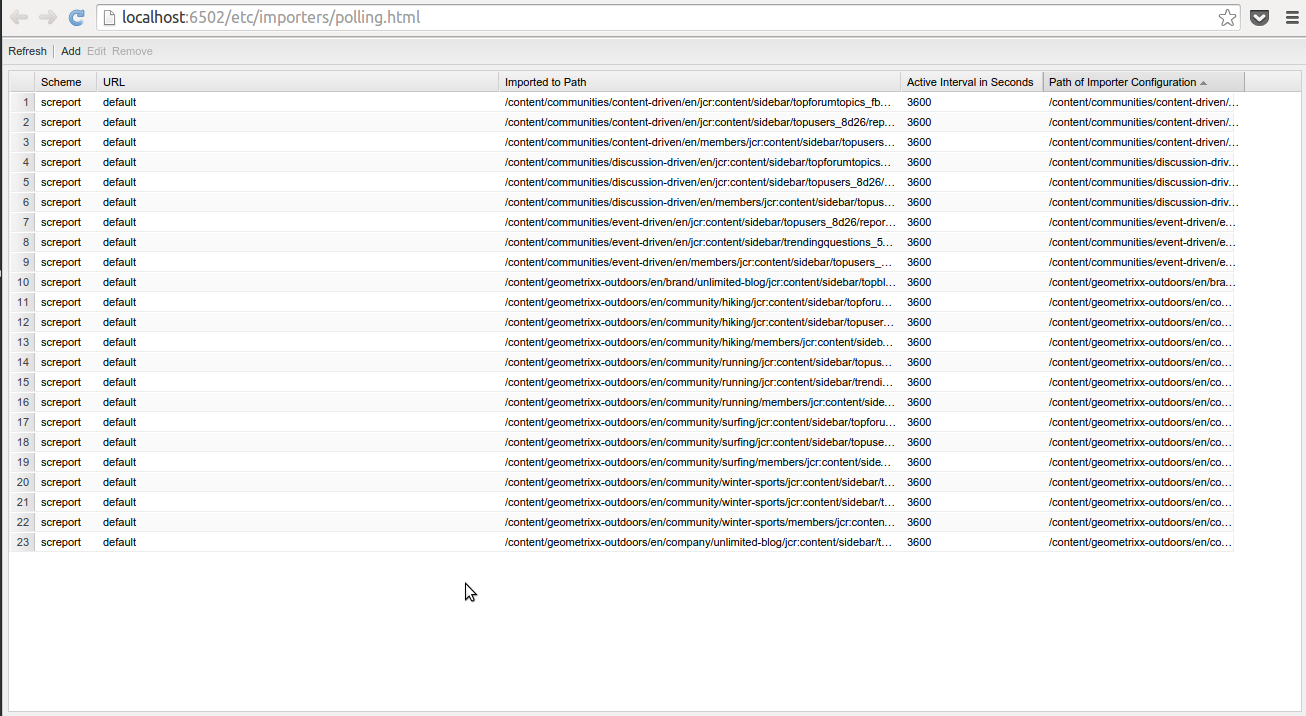


And Open the Feed Importer page, it will open a page as shown 
below :


 Now click on the Add button and complete the dialog as shown below:
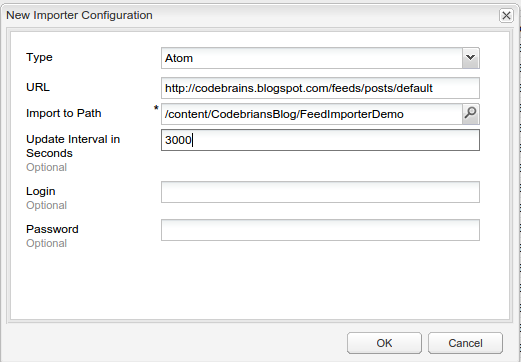


Here is link for Atom feeds of Codebrians blog :

http://codebrains.blogspot.com/feeds/posts/default

The moment OK is clicked a Polling configuration node is created, that will poll given feed URL and fetches new data back to CQ then creates pages under given hierarchy.

Here is the one of the auto-create page:


Here is the Link to Github repository of Codebrains to refer the code : 
https://github.com/ankit-gubrani/Codebrains

Wednesday, 12 November 2014

Populate dropdown in CQ5 dialog using Servlet

Dropdowns in CQ5 are easy to create and use, all that needs to be done is create a node with name options and primaryType as cq:widgetcollections and sub-nodes with options.

But problems comes in when the dropdowns with dynamic data or options is to be created. So, in this blog you will see how to address the problem of populating dropdown dynamically.

Firstly, create a source from which data is to be fetched in our case we have registered a Servlet in OSGI at path "/bin/codebrains.json" which returns a JSON object as :

{"root":[{"text":"CodeBrains_Text_0","value":"CodeBrains_Value_0"},{"text":"CodeBrains_Text_1","value":"CodeBrains_Value_1"},{"text":"CodeBrains_Text_2","value":"CodeBrains_Value_2"},{"text":"CodeBrains_Text_3","value":"CodeBrains_Value_3"},{"text":"CodeBrains_Text_4","value":"CodeBrains_Value_4"}]}

Once your servlet is ready and it gives response in the desired format, now browse to Dropdown widget node and add properties that are shown below :


Add following properties on the node :
  • xtype (Required) : selection
  • type : select
  • options (Optional but required if data is to be fetched from servlet) : <path-of-the-servlet> [Value of this property should be path of servlet which will serve the JSON data to be populated in the combo-box]. In our case its value should be "/bin/codebrains.json" as it the path at which servlet is registered in OSGI. 
  • optionsRoot  (Optional):  [Name of the property that contains options array. Use "." or dot-annotation to get till the property that contains options array. ] In our case its value should be "root" as root property of JSON object contains the Array.
  • optionsTextField (Optional): [Name of the field for the options text. This property is used if options object does not contains Text property which is read by default.
  • optionsValueField (Optional) : [Name of the field for the options value. This property is used if options object does not contains Value property which is read by default. ] (Optional)
  • allowBlank  (Optional) : [This property should have boolean value and is used to make any field mandatory. If set false that widget becomes mandatory cannot be set blank. ]


Here is the Link to Github repository of Codebrains to refer the code : 
https://github.com/ankit-gubrani/Codebrains

Sunday, 9 November 2014

How to reduce file file size of a image using GIMP ?

Does bulky sized images eats up significant amount of space of your disk ? Or such big file size images becomes a barrier to share these images ?    

Here is the solution for you to reduce the file size of a image using GIMP. 

There are two ways by which size of a image can be controlled : 
  1. First by Scaling the image i.e resizing the image.
  2. Second Compressing an image i.e image compression means reducing the size of graphics file.

Resizing the Image(Solution 1) :


Open up the image you want to reduce size of. Then form Scale menu select Scale Image option to open Scale Image Dialog. Same dialog can be opened up by right clicking on the  image → image → Scale Image.


This will open the Scale Image dialog. In the width field of Scale Image dialog and hit tab height will be calculated automatically. Now this image is scaled and size of the image will be reduced on saving.  


Compressing The Image(Solution 2) :


This is a easier way to  reduce the image. All you need to do is, open any image in GIMP. Then go to file → Save As. This will open the Save image dialog

On clicking Save another dialog will  pop up that gives user an option to provide quality of the image. Higher the quality, bigger will be the size of the image.


Your comments and suggestions are welcome.