Showing posts with label Ankit Gubrani. Show all posts

Saturday, 24 October 2015

Integrating Apache Wookie with AEM


Interactive websites - term making a lot of buzz over world wide web. 

But what are Interactive websites ?

Interactive websites are the ones which provides a number of different features to make interactive experience for users. One of the most important qualities of a website is interactivity. It allows users to interact with the website. With change of time web visitors expect to interact meaningfully with websites. 
There interactive aspects of a website often include : 
  • responsive forms
  • chat applications
  • games
  • or some sort of mini applications

Though creating any such feature is not a rocket science but it does comes with some development time associated with each feature. And creating such site in AEM would also cost time as there are no such features provided in AEM 'out of the box'. 

What if we have a central server where we can have such mini applications and use them directly in AEM ? 
Where users can select from a wide variety of interactive mini applications like chat-applications, geolocation sharing apps, a to-do list or a game and many such ready to use mini applications. 

Integrating Apache wookie with AEM allows users to drag & drop such interactive application. We have developed a connector tool for connecting AEM with apache wookie : AEM-WookieConnector 

Apache wookie is Java server application with allows you to upload & deploy widgets (mini web applications) for your applications. Using AEM-Wookie Connector tool AEM users can use simply drag n drop wookie widgets on their AEM pages and use from any where. 

Here are the steps to install AEM-WookieConnector Tool : 


  • Install Wookie as a standalone jar or as a WAR version from instructions given here
  • Next, Clone the AEM Wookie connector 
  • Build and Deploy :
       mvn clean install -PautoInstallPackage
  • Configure and provide the Wookie server URL and API Key


  • And Start Using !


  • AEM Wookie connector tool was presented as a solution to wider audience at a annually organized event AEMHub 

    Other useful links :


    Wednesday, 19 August 2015

    Creating custom Content Finder tab in AEM

    AEM provides a quick and easy way to find & use content while editing a page via Content Finder. Content Finder is a way to search different types of assets stored in AEM and make them available for drag N drop on the pages. 

    Creating a custom tab in Content finder makes it easier for user locate content or drag N dropable data. While creating a connector tool for AEM I came across this use case where I had to provide custom tab in the content finder to make data available for user while editing the page. 


    Creating custom tab is a 2 step process : 

    • Creating a back-end service for providing data.
    • Creating custom content finder step.

    1. Back-end service : It provides the data to the custom content finder tab to display. For this post I have created a text file with JSON data, in real world scenario it would be a service providing dynamic data.

    2. Creating custom content finder step : 

    • Create a folder with jcr:primaryType as sling:folder under /apps/wcm/extensions hierarchy with name contentfinder.
    • Set property extensionGroup as tabs on "contentfinder" folder.
    • Set property extensionType as "contentfinder_extension" on contentfinder folder.
    • Now create a JS file under contentfinder folder.  

    Above code creates a new content finder tab with name mentioned as tabTip property, setting the ranking as 1 makes this tab to appear on #1 position in the content finder, iconCls property sets the class on the tab and displays the icon on the tab. The most important part is creating a result box using CQ.wcm.ContentFinderTab.getResultsBoxConfig to display the result fetched from URL mentioned. 
    After creating a similar JS file there will be new tab added in the content finder as shown here :  


    Here is the link to github repository : 
    https://github.com/ankit-gubrani/Codebrains


    Thursday, 12 March 2015

    Requesting AEM Component via AJAX

    Why?
    In AEM pages are created in modular fashion and this modularity is achieved using components. But we often come across a situation where we want a specific component to be reloaded and not the complete page but mostly dispatcher is the main reason for loading a component via AJAX.

    As dispatcher caches component's output html due to which dynamicity of a component becomes questionable. For instance if we want a component to show unique results with each request. Loading component via AJAX is one way out for handling such scenarios.


    Sample AJAXified component

    How?
    To request a component via AJAX we will be using a Sling trick. In this trick we will request the URL to the component node then Sling resolution comes into the picture and it look for sling:resourceType property ,executes the script at given path & sends final HTML response.

    It is quite straight forward to implement this approach. We need to create a cq:component and the Javascript code for making a AJAX request.  As we would want our component to give unique response each time, we can either use a selector or query parameters and then give response accordingly.

    Code snippet below gives an example of how to request the desired component via ajax and show  the latest result.

    But for requesting a component's node we need to store the path on which we would be requesting, we will have to store that on our page itself in the page's DOM. Like shown below:

    Now we just need to read the path of the component node and request for component to reloaded via AJAX. Here is the sample jQuery method for how to achive this.

    I have created a demo component which is loaded on the page via AJAX. To use it one need to drop AJAX Demo Component inside parsys of AJAX Demo Warpper component and on press of reload button it reloads the component via AJAX.

    Here is the link for code repository for a sample component that is reloaded via AJAX : Requesting cq:components via AJAX

    Wednesday, 12 November 2014

    Populate dropdown in CQ5 dialog using Servlet

    Dropdowns in CQ5 are easy to create and use, all that needs to be done is create a node with name options and primaryType as cq:widgetcollections and sub-nodes with options.

    But problems comes in when the dropdowns with dynamic data or options is to be created. So, in this blog you will see how to address the problem of populating dropdown dynamically.

    Firstly, create a source from which data is to be fetched in our case we have registered a Servlet in OSGI at path "/bin/codebrains.json" which returns a JSON object as :

    {"root":[{"text":"CodeBrains_Text_0","value":"CodeBrains_Value_0"},{"text":"CodeBrains_Text_1","value":"CodeBrains_Value_1"},{"text":"CodeBrains_Text_2","value":"CodeBrains_Value_2"},{"text":"CodeBrains_Text_3","value":"CodeBrains_Value_3"},{"text":"CodeBrains_Text_4","value":"CodeBrains_Value_4"}]}

    Once your servlet is ready and it gives response in the desired format, now browse to Dropdown widget node and add properties that are shown below :


    Add following properties on the node :
    • xtype (Required) : selection
    • type : select
    • options (Optional but required if data is to be fetched from servlet) : <path-of-the-servlet> [Value of this property should be path of servlet which will serve the JSON data to be populated in the combo-box]. In our case its value should be "/bin/codebrains.json" as it the path at which servlet is registered in OSGI. 
    • optionsRoot  (Optional):  [Name of the property that contains options array. Use "." or dot-annotation to get till the property that contains options array. ] In our case its value should be "root" as root property of JSON object contains the Array.
    • optionsTextField (Optional): [Name of the field for the options text. This property is used if options object does not contains Text property which is read by default. ] 
    • optionsValueField (Optional) : [Name of the field for the options value. This property is used if options object does not contains Value property which is read by default. ] (Optional)
    • allowBlank  (Optional) : [This property should have boolean value and is used to make any field mandatory. If set false that widget becomes mandatory cannot be set blank. ]


    Here is the Link to Github repository of Codebrains to refer the code : 
    https://github.com/ankit-gubrani/Codebrains

    Sunday, 9 November 2014

    How to reduce file file size of a image using GIMP ?

    Does bulky sized images eats up significant amount of space of your disk ? Or such big file size images becomes a barrier to share these images ?    

    Here is the solution for you to reduce the file size of a image using GIMP. 

    There are two ways by which size of a image can be controlled : 
    1. First by Scaling the image i.e resizing the image.
    2. Second Compressing an image i.e image compression means reducing the size of graphics file.

    Resizing the Image(Solution 1) :


    Open up the image you want to reduce size of. Then form Scale menu select Scale Image option to open Scale Image Dialog. Same dialog can be opened up by right clicking on the  image → image → Scale Image.


    This will open the Scale Image dialog. In the width field of Scale Image dialog and hit tab height will be calculated automatically. Now this image is scaled and size of the image will be reduced on saving.  


    Compressing The Image(Solution 2) :


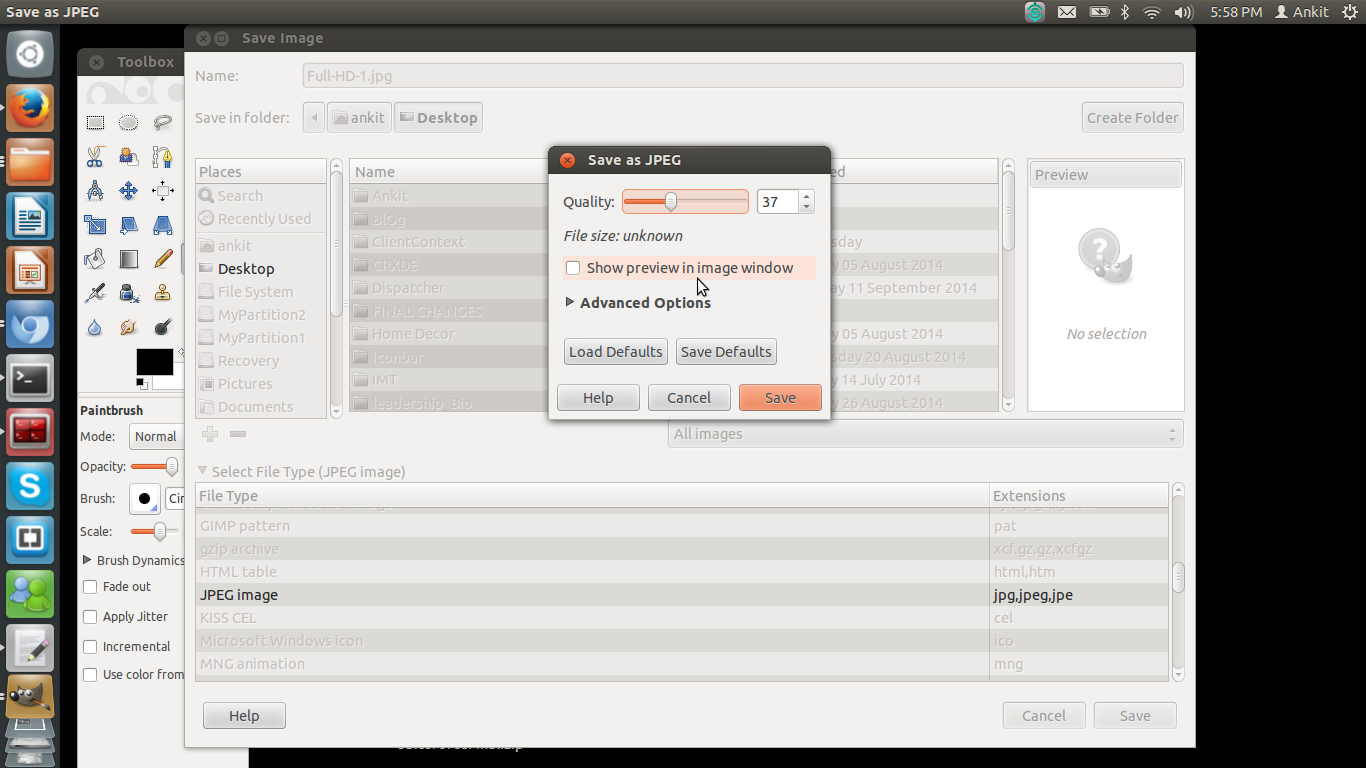
    This is a easier way to  reduce the image. All you need to do is, open any image in GIMP. Then go to file → Save As. This will open the Save image dialog

    On clicking Save another dialog will  pop up that gives user an option to provide quality of the image. Higher the quality, bigger will be the size of the image.


    Your comments and suggestions are welcome.