Tuesday, 20 January 2015

OSGI : Creating Factory configuration in CQ

AEM houses a powerful open source framework in its technology stack, Apache Felix. Felix is a open source implementation of OSGi. OSGi provides a way to manage bundles and their configurations.

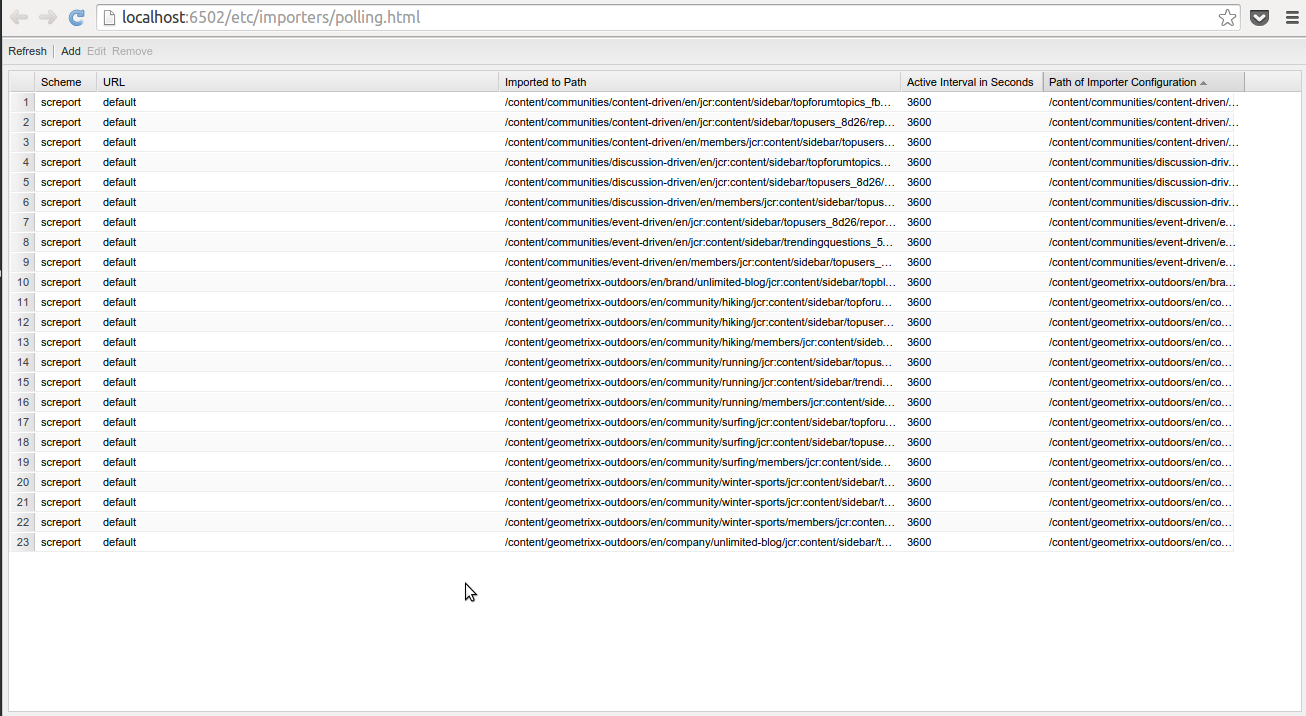
OSGi provides a way to configure services and modify those configurations on the run-time. But apart from this there is a another powerful feature that OSGi provides that is : ability to create Factory Configurations. Factory Configurations is a way to create a single service, and bind multiple configurations to it  & then consume those configurations from different classes/Services. You all might have used Logger service provided by CQ out of the box, logger is an example of factory configuration service. 


Factory Configuration


Here are the steps for how to create factory configuration in CQ.

Step 1:

Create a Component/Service class to hold configurations values. This component will act a interface for adding properties of multiple configurations. Key for creating this Component/Service class is that declare this class as a configurationFactory and pass configuration policy as required.


Step 2:

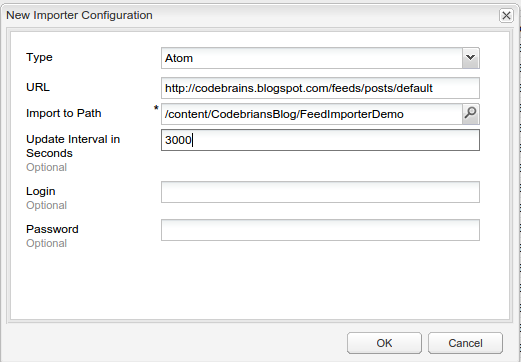
Create a service to that actually uses the FactoryConfig Component/Service as a interface to allow user to add configuration and accept values of properties. For creating this service we will use dynamic binding of OSGi. We will have to create a collection of FactoryConfig class and binding & unbinding methods are also required that will add or remove each FactoryConfig object in/from the collections.


Here is the link to code repository for this service : OSGi Factory Config

Wednesday, 10 December 2014

Default vaules with CQ5/AEM component

Attimes we come across a situation while creating Components in CQ/AEM, where we want a default value of some property to be set the moment component is dropped. This can be done via JCR API but there is an easy way that I will cover in this post.

Using cq:template node :


cq:template node

Simply create a node under component node with name "cq:template" of type "nt:unstructured". 


Now add any property on this node you want to set as default value on the component. Not only properties you can even add node under this node if you want to create a default node under the component node.


Component node hierarchy under /apps 

And Its done. Now every time you drop this component on any page, default values will be created under the component node as shown below :

Final node hierarchy under /content

Here is link to code repository for this component : https://github.com/ankit-gubrani/Codebrains/commit/eea7cc35ae9c736e7ac4d39b398a37f9e5939b88

Saturday, 15 November 2014

Feed importer in Adobe CQ/AEM

AEM comes with a pre-installed feature to import feeds into CQ. Feed importer comes with capability to import RSS and Atom feeds.

Hey!! Wait before that you must be thinking, what is a feed?

Web feed is a way to provide users with updated content. Web feeds are commonly used for news updates as news are the most frequently updating data.

Feed importer is a service to fetch data from feeds or any external source of data on a periodic basis and save data fetched, in the form of CQ page.It polls the specified external data source in given interval.


Here are the steps how to create feed importer in CQ :


Firstly, create a page under which all the imported data will be saved in the form of CQ:Page. All the new pages that will be created under root page will have sling:resourceType property's value same as the root page.

Now once root page is created, create Feed importer :

Open http://<host>:<port>/etc/miscadmin and go to importers


And Open the Feed Importer page, it will open a page as shown 
below :


 Now click on the Add button and complete the dialog as shown below:


Here is link for Atom feeds of Codebrians blog :

http://codebrains.blogspot.com/feeds/posts/default

The moment OK is clicked a Polling configuration node is created, that will poll given feed URL and fetches new data back to CQ then creates pages under given hierarchy.

Here is the one of the auto-create page:


Here is the Link to Github repository of Codebrains to refer the code : 
https://github.com/ankit-gubrani/Codebrains

Wednesday, 12 November 2014

Populate dropdown in CQ5 dialog using Servlet

Dropdowns in CQ5 are easy to create and use, all that needs to be done is create a node with name options and primaryType as cq:widgetcollections and sub-nodes with options.

But problems comes in when the dropdowns with dynamic data or options is to be created. So, in this blog you will see how to address the problem of populating dropdown dynamically.

Firstly, create a source from which data is to be fetched in our case we have registered a Servlet in OSGI at path "/bin/codebrains.json" which returns a JSON object as :

{"root":[{"text":"CodeBrains_Text_0","value":"CodeBrains_Value_0"},{"text":"CodeBrains_Text_1","value":"CodeBrains_Value_1"},{"text":"CodeBrains_Text_2","value":"CodeBrains_Value_2"},{"text":"CodeBrains_Text_3","value":"CodeBrains_Value_3"},{"text":"CodeBrains_Text_4","value":"CodeBrains_Value_4"}]}

Once your servlet is ready and it gives response in the desired format, now browse to Dropdown widget node and add properties that are shown below :


Add following properties on the node :
  • xtype (Required) : selection
  • type : select
  • options (Optional but required if data is to be fetched from servlet) : <path-of-the-servlet> [Value of this property should be path of servlet which will serve the JSON data to be populated in the combo-box]. In our case its value should be "/bin/codebrains.json" as it the path at which servlet is registered in OSGI. 
  • optionsRoot  (Optional):  [Name of the property that contains options array. Use "." or dot-annotation to get till the property that contains options array. ] In our case its value should be "root" as root property of JSON object contains the Array.
  • optionsTextField (Optional): [Name of the field for the options text. This property is used if options object does not contains Text property which is read by default.
  • optionsValueField (Optional) : [Name of the field for the options value. This property is used if options object does not contains Value property which is read by default. ] (Optional)
  • allowBlank  (Optional) : [This property should have boolean value and is used to make any field mandatory. If set false that widget becomes mandatory cannot be set blank. ]


Here is the Link to Github repository of Codebrains to refer the code : 
https://github.com/ankit-gubrani/Codebrains

Sunday, 9 November 2014

How to reduce file file size of a image using GIMP ?

Does bulky sized images eats up significant amount of space of your disk ? Or such big file size images becomes a barrier to share these images ?    

Here is the solution for you to reduce the file size of a image using GIMP. 

There are two ways by which size of a image can be controlled : 
  1. First by Scaling the image i.e resizing the image.
  2. Second Compressing an image i.e image compression means reducing the size of graphics file.

Resizing the Image(Solution 1) :


Open up the image you want to reduce size of. Then form Scale menu select Scale Image option to open Scale Image Dialog. Same dialog can be opened up by right clicking on the  image → image → Scale Image.


This will open the Scale Image dialog. In the width field of Scale Image dialog and hit tab height will be calculated automatically. Now this image is scaled and size of the image will be reduced on saving.  


Compressing The Image(Solution 2) :


This is a easier way to  reduce the image. All you need to do is, open any image in GIMP. Then go to file → Save As. This will open the Save image dialog

On clicking Save another dialog will  pop up that gives user an option to provide quality of the image. Higher the quality, bigger will be the size of the image.


Your comments and suggestions are welcome.


Wednesday, 22 October 2014

AEM Multifield with different widgets

Multifield widget in AEM was introduced to allow authors to enter any number of values they want and multifield serves its purpose pretty well. But multifield widget out of the box provides only textbox to take input from author. And at times we are in a situation where we want multifield with different widget for eg pathfield or a textarea or datefield. 

In this article we will see how to create or use multifield with different widgets or Xtypes.


Default Multifield widget

Solution : 

Creating a multifield with custom xtype or widget is a two step process. 

Step 1 : Create a multifield widget i.e create a new widget with xtype multifield. But this will create multi-type with only text field for input as shown above. 

FieldConfig node


Step 2 : create another widget with name fieldConfig and add value of xtype property as whatever widget you want in multifield, in this example we have used pathField. 

 
Multifield with pathfield as xtype Multifield with Datefield as xtype


The values that are stored can be accessed the same ways we access in a values of default mutifield widget. 

For reference, here is the Link for the demo Multi-field component : 

https://github.com/ankit-gubrani/Codebrains/tree/master/content/src/main/content/jcr_root/apps/codebrains/components/content/multifieldDemo    

Monday, 4 August 2014

AEM Project Setup using Maven

This article focuses on how to setup a AEM/CQ project using Maven and explaining the basic structure of AEM projects. 

Lets start with a brief about APACHE MAVEN :

Maven is a build automation tool that helps managing the builds of the projects and their dependencies (jar files required). It is based on the concept of POM (Project Object Model). There are numerous number of maven plugins available over the internet, each of which fulfills a different purpose.As we are here for AEM Project setup we won't cover anything more about maven here.

Now let us see the folder structure of a AEM Project which you get to see in CRXDE Lite :
  • /apps : Top level folder whatever you code will be stored in this folder.
  • /apps/[YOUR-APP-FOLDER] : Root folder of one out of many projects that you will be creating under apps folder.
  • /apps/[YOUR-APP-FOLDER]/components : Folder that contains all the components and their respective JSPs.
  • /apps/[YOUR-APP-FOLDER]/templates : Folder that contains all the templates that you will be creating, which points to respective page component.
  • /apps/[YOUR-APP-FOLDER]/install : Folder that contains bundle of your project.
  • /apps/[YOUR-APP-FOLDER]/config : Folder that stored configuration specific to this project.
  • /etc/design//[APP-DESIGN-PAGE] : Design page of your application that stores all clientlibs (JS and CSS) and other static resources as well.
  • /content/dam/[YOUR-APP-DAM-FOLDER] : Folder that contains all the assets of your site.
  • /content/[YOUR-SITE] :  Location where site is stored .

Before we move forward here are some pre-requisites that should be available on your machine (installed) for building AEM project using maven : 

  1. First and foremost would be Apache MAVEN .
  2. Adobe AEM/CQ running instance.
  3. Any IDE eg Eclipse , Idea, Netbeans etc(Here we are using Intellij Idea for this example)
Link of source code for the demo project created https://github.com/ankit-gubrani/Codebrains

Here are the steps to create AEM Project using maven :


Step 1 : Create maven project using Adobe's multimodule-content-package-archetype. Using Command prompt go to the directory where you want to create project and run following command :

mvn archetype:generate -DarchetypeRepository=http://repo.adobe.com/nexus/content/groups/public/ -DarchetypeGroupId=com.day.jcr.vault -DarchetypeArtifactId=multimodule-content-package-archetype -DarchetypeVersion=1.0.2

after this maven will prompt and ask for some information(like groupid, arifactid,version etc), provide that infomation and your project will be created.This will create a multimodule maven project with 2 modules (Bundle and Content)

Step 2 : Verify the code if it works fine or not. You can check it by running command :

mvn clean install 

if it completes without any error that means project was made successfully.

Step 3 : Import the project in any IDE . Here in the example I am using IntelliJ Idea : 


Step 4 : Now that everything is set in place , import the project in CQ running instance by running command : 

mvn clean install -PautoInstallPackage 

but if you are running CQ on different port or if username and passowrd is changed used following cmmand :

mvn clean install -PautoInstallPackage -Dcrx.port=3502 -Dcrx.username=newuser -Dcrx.password=newpassword

This will install the project in CQ instance and you can see following folder structure iunder your project : 


And this is it we are done with creating a AEM project using maven build tool. 

Using this you will create a two module maven project. Those modules are :

  1. Content Module : This module contains all the code that will pe under apps/[YOUR-APP-PROJECT] or /etc/[DESIGN-PAGE] or /content/[ANY-PAGE] folder.
  2. Bundle Module : This module contains all the java files that will be wrapped up into a bundle and will be installed into Feilx.


Here is the source code for the demo project created https://github.com/ankit-gubrani/Codebrains


Your comments and suggestions are welcome.